

If you want to do 360 product photography, there are a few things you need to know. First, you’ll need a panoramic tripod head and a DSLR camera. You’ll also need to setup your camera in manual mode so that the shutter speed and aperture are both under your control.
Once everything is ready, take a series of photos around the object while rotating the tripod head slowly. Make sure to overlap each photo by about 30%. Finally, stitch all the photos together using software like Hugin or PTGui and you’re done!
- Choose your product and set it up in the middle of a room or on a tabletop
- Set up your camera on a tripod and position it directly above the product
- If using a DSLR, set your camera to manual mode and adjust the shutter speed, aperture, and ISO to get a well-exposed image
- Take a series of photos around the product, making sure to overlap each shot by about 30%
- Once you have all of your photos, upload them to software that will stitch them together into a 360-degree image (such as Photoshop or Lightroom)
360 Product Photography with Speedlights & Turntable | Photography & Photoshop Editing Tutorial
What is 360 Degree Product Photography?
360 degree product photography is a type of photography that allows the viewer to see the product from all sides. This can be done with either a traditional camera or a 360 degree camera. With a traditional camera, multiple photos must be taken at different angles and then stitched together to create the 360 degree view.
A 360 degree camera captures all angles simultaneously and creates a seamless 360 degree image.
This type of photography is often used for e-commerce, as it allows potential customers to get a complete view of the product before they purchase it. It can also be used for marketing purposes, as it gives potential customers an immersive experience that allows them to interact with the product in a way that is not possible with traditional photographs.
360 degree product photography can be challenging, as it requires precise planning and execution in order to capture all angles of the product without any gaps or overlaps in the final image. However, when done correctly, it can provide viewers with an incredibly detailed and realistic view of the product that is being photographed.
How Do You Make a 360 Spin Image?
There are a few ways to make a 360 spin image, but the most common and effective way is to use an app or software that allows you to create an interactive image. Once you have your 360 spin image created, you can then embed it onto your website or blog for others to view.
The first step is to choose the right app or software for creating your 360 spin image.
There are many different options available, but some of the most popular include ThingLink, Spin360 and 3DVista. Each of these offers slightly different features and capabilities, so be sure to choosethe one that best suits your needs.
Once you’ve selected your app or software, it’s time to start creating your 360 spin image.
This process will vary depending on which option you’ve chosen, but in general, you’ll need to upload a series of photos or videos that show all sides of the object or scene you’re trying to capture. Afterward, you’ll use the tools within the app or softwareto stitch everything together into a seamless 360-degree view.
Finally, once your 360 spin image is complete, it’s time to share it with the world!
If you’re posting it on a website or blog, most platforms will allow youto easily embed your creation. Otherwise, there are plenty of free hosting services that will give you a URL where others can view your work – just be sure toprovide clear instructions on how they can do so (i.e., by clicking and dragging their mouse).
How Do You Make a 360 Image Product?
If you want to make a 360 image product, there are a few things you need to do. First, you need to have a 360-degree camera. This type of camera allows you to take pictures and videos in every direction.
You can find these cameras online or at some electronics stores.
Once you have your camera, set it up in the middle of the room or area that you want to capture. Make sure there is nothing obstructing the view in any direction.
Then, start taking pictures or videos. The key to getting good 360 images is to move slowly and deliberately so that each frame is clear and sharp.
Once you have all the footage you need, transfer it to your computer and edit it using video editing software.
There are many programs available, both paid and free. Just choose one that suits your needs and preferences. Then, export your final product as a video file or an image sequence that can be viewed on a VR headset or other devices.
How Do You Take 360 Video Products?
Most 360 video cameras have two lenses side by side, which allows them to capture a full spherical view of their surroundings. This type of camera is often mounted on a tripod or another stable surface in order to get the clearest possible image. To take a 360 video product, simply press record and pan the camera around to capture the entire scene.

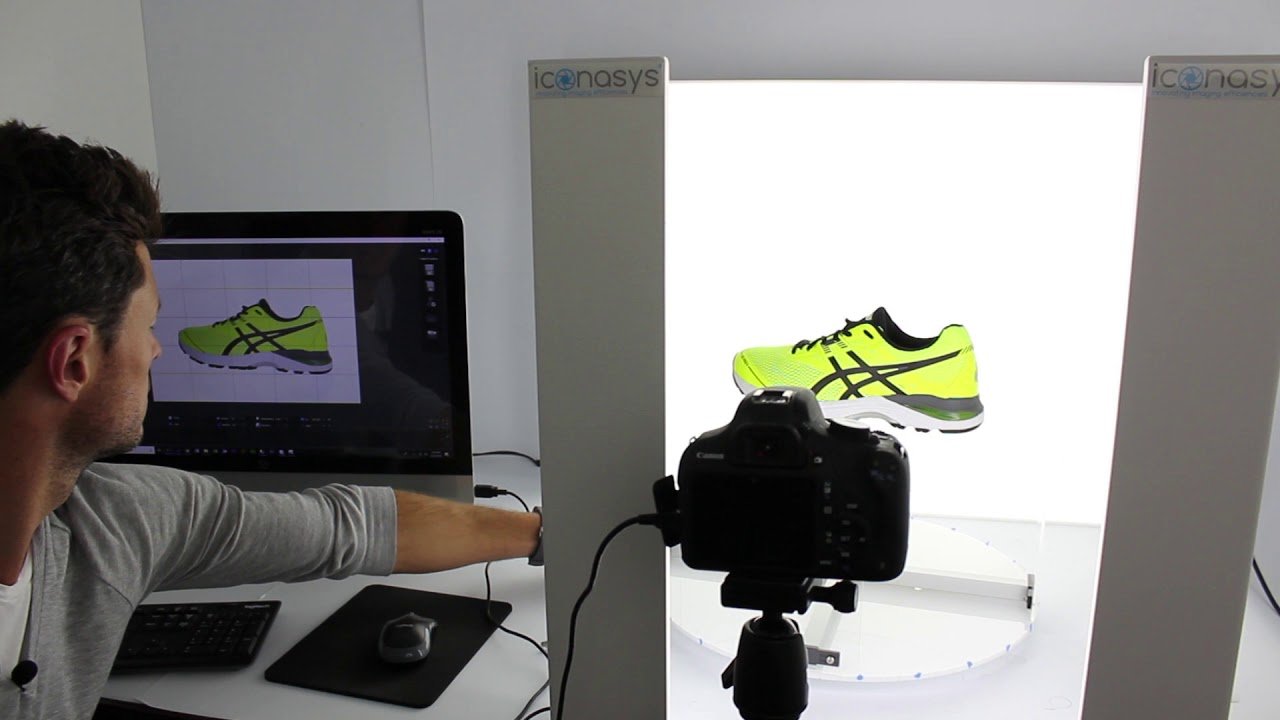
Credit: www.iconasys.com
Create 360 Spin Image Free
If you want to create a 360 spin image for free, there are a few things you need to know. First, you need to have an image that is at least 300 pixels wide. Second, you need to have a place to host the image.
And lastly, you need to use a software program that can create the 360 spin effect.
There are many software programs that can create 360 spin images for free. But not all of them are created equal.
Some are better than others and some will be easier for you to use than others. In this blog post, we’ll show you how to create a 360 spin image using the free software program Panorama Maker 6.
First, open Panorama Maker 6 and click “New Project.”
Select the “360 Spin” option from the list of project types. Then click “Next.”
On the next screen, select the image that you want to use for your 360 spin image.
The recommended size for the image is 300 pixels wide. But if your image is larger or smaller, it will still work just fine. Once you’ve selected your image, click “Open.”
Now that your image is loaded into Panorama Maker 6, it’s time to create the 360spin effect! To do this, simply click on the “Create Spin” button located in the top toolbar.
Once you’ve clicked on the “Create Spin” button, your cursor will change into a crosshair symbol .
Move your cursor over any point in yourimage and left-click . Doing this will setthe starting point of your 360spin animation . Now moveyour cursor around in a circle and left-click again whenyou’ve made one complete revolution . This secondpoint will be used as the ending pointof your animation . You can keep clickingto add more points , but two pointsare really all you need .
When you’re happy with how your animation looks , simply click onthe ” Play Animation” button locatedin the bottom toolbar . Your 360spinanimation will now play back automatically ! Ifyou want , you can also saveyour animation as an AVI file by clickingon File > Save As…> AVI format .
Creating beautiful360spin imagesis easy and fun withPanorama Maker 6 ! So give ita try today !
360 Product Photography Turntable
If you’re a product photographer, chances are you’ve considered using a 360 product photography turntable. These devices allow you to take high-quality photos of your products from every angle, making it easy to showcase them on your website or online store.
There are many different types of 360 product photography turntables available on the market, ranging in price and features.
Some of the more popular options include the Orbitvu Alpha and the Shooting Star Turbo.
Both of these turntables offer excellent features and capabilities, but which one is right for you? To help you decide, we’ve put together a side-by-side comparison of the two models.
Read on to learn more about each option and see which one is best suited for your needs.
Create 360 Spin Image Photoshop
If you want to create a 360 spin image in Photoshop, it’s actually pretty easy! You just need to have a series of images that show your product from all angles. Once you have those images, open them up in Photoshop and create a new file.
Then, go to the “Layer” menu and select “New Layer From Stack.” This will create a new layer for each image in your stack.
Now, go to the “Edit” menu and select “Auto-Blend Layers.”
This will automatically blend your layers together so that they appear as one seamless image. Make sure the “Seamless Tones and Colors” option is selected and then click OK.
Finally, go to the “File” menu and select “Save As.”
Choose JPEG as your file format and make sure to name your file something like “myfile_360spin.jpg.” That’s it! Now you have a 360 spin image that you can use on your website or blog.
Conclusion
If you want to take your product photography to the next level, 360 product photography is the way to go. This type of photography allows you to show your products from every angle, giving potential customers a complete view of what they’re buying.
So how do you get started with 360 product photography?
Here are a few tips:
1. Use a tripod: A tripod will help keep your camera steady as you rotate it around your product. This will result in sharper images and less blurriness.
2. Use a light box: A light box helps diffuse the light and reduce shadows, resulting in more evenly lit photos.
3. Shoot in RAW: Shooting in RAW mode gives you more flexibility when editing your photos later on. It also results in higher quality photos overall.
4. Take multiple shots: Take several shots of your product from different angles. This will give you plenty of options to choose from when putting together your final 360 image.
5. Edit carefully: When editing your 360 photos, be careful not to distort the image too much.
You want people to be able to recognize your product, so don’t go overboard with the Photoshop!
